The Absolute BEST Streusel Pumpkin Pie {Dairy Free Filling}
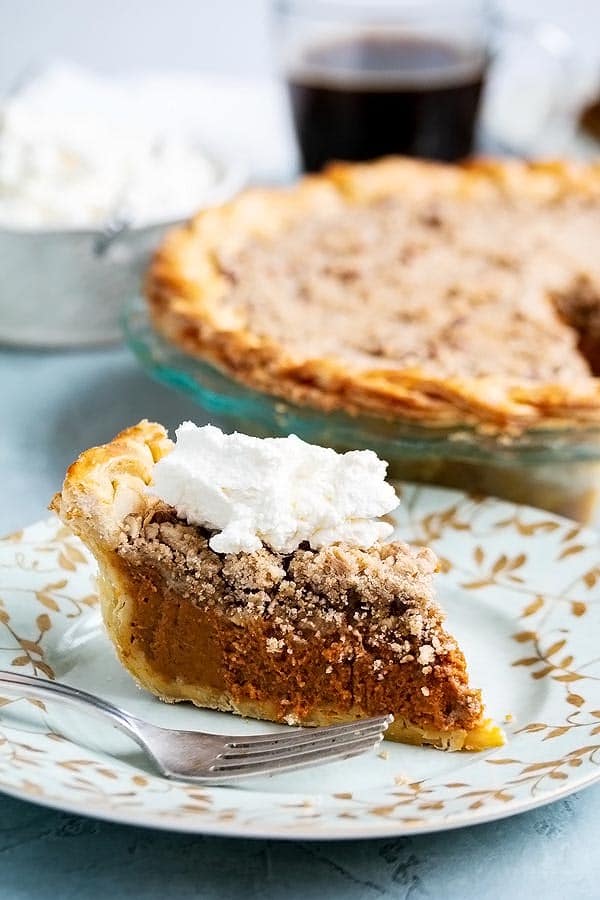
This streusel pumpkin pie has a creamy dairy free filling, is perfectly spiced, and the pecan cinnamon streusel topping makes this a pumpkin pie like you have never had before!
There nothing more thanksgiving than pumpkin pie, except maybe the turkey itself. Its actually become a symbol of fall and no thanksgiving dinner is complete without one.
If you love pumpkin pie, you are in for a real treat!
To be honest, I am not a big pumpkin anything person, but I LOVE this pie! And Debbie, who is a pumpkin anything connoisseur, is IN love with this pie!
The biggest difference between our pie and any regular homemade pumpkin pie is the streusel! It’s usually the toppings that make all the difference, right? This case is no exception.
Well the streusel topping AND that our filling is dairy free.
The streusel is very likely Debbie’s favorite part. Mine too actually. Although its ALL. SO. GOOD!
You might notice that our filling is dairy free, but the pastry crust and the streusel topping has butter which is, of course, dairy. If you can’t have dairy at all, we will give some options below for making this a completely dairy free pumpkin pie. Otherwise, stick with butter on those parts. It tastes better.
Lets get on with it…
Tools You Will Need
- pastry cutter – to make the pastry
- rolling pin
- pie plate
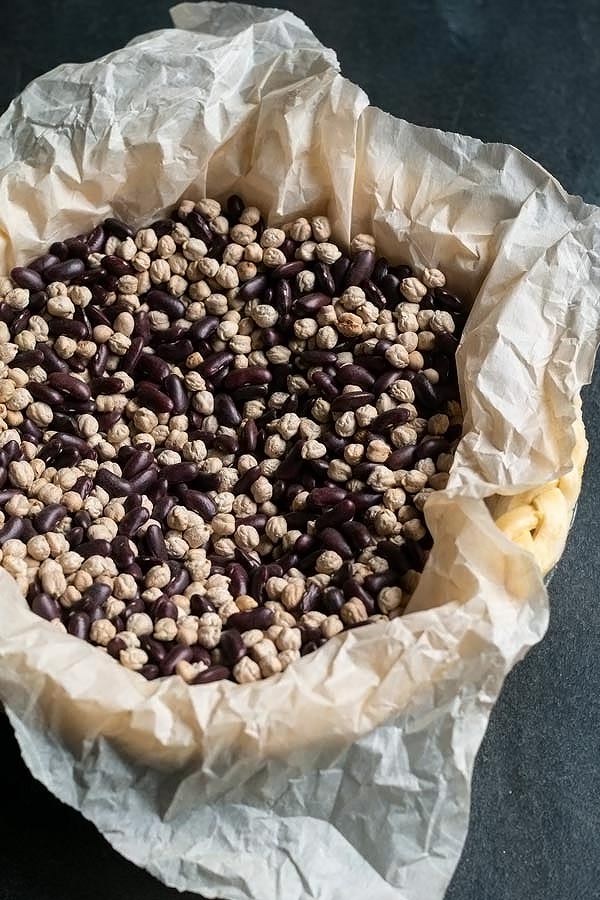
- pie weights – or you can use beans like I do
- pie crust shield – I used foil, but I am so getting these
- stand mixer – or you can use handheld or just mix by hand
- whipping cream dispenser! – so awesome
How to Make Pumpkin Pie!
You can find all the steps to make this pumpkin pie in the recipe card below, however Im going to go over each section here to give you extra information, tips and tricks so that your pie turns out perfect!
How to Make the Crust
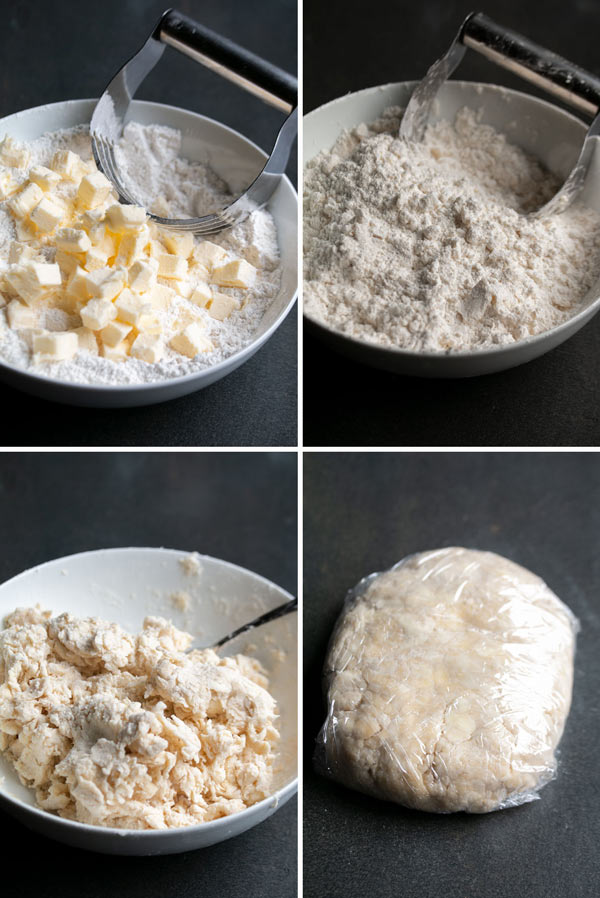
You might be tempted to buy the pastry for your pie, but honestly, making your own pie crust is super easy and it tastes way better! Here is how its done:
- mix your dry ingredients
- cut in the cold butter with a pastry cutter till it resembles small peas (see the 3rd photo above)
- add the wet ingredients while stirring with a fork
- mix until just combined
- wrap in plastic wrap and set it in the fridge to chill for at least an hour
Tips for Making the Pie Crust
- always use very cold ingredients
- I put an ice cube in with the egg yolk, water, and vinegar to keep it extra cold
- you can use vodka instead of vinegar if you like, it works the same. I just like the flavor of vinegar 🙂
- when you are mixing the wet ingredients in, its ok if the dough is quite floury. It doesn’t have to be completely mixed in. The moisture in the dough will absorb all the flour as the dough chills. The more you work the dough, the less flaky it will be and you want flaky!
Make Dairy Free Pie Crust
All you have to do to make your pie crust dairy free as well is exchange the butter for vegetable shortening. Or you can use lard. Lard makes for an extra flaky crust!
Should you Blind Bake Crust for Pumpkin Pie?
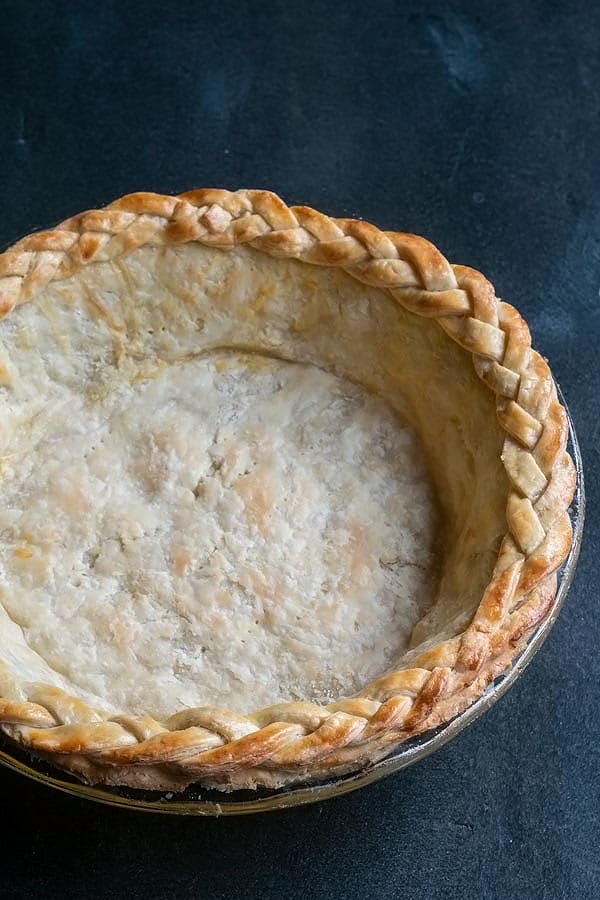
I have done it both ways. Bind baked crust and not. In my experience, the blind baked crust is WAY WAY better. It doesn’t get soggy and it is flaky on the bottom still. It is one more step, yes, but its worth it.
See how flaky and crispy it looks? Even on the bottom!
Tips to Blind Bake the Pie Crust
If you have ever blind baked a pie crust and the edges have fallen down the sides and created issues for you, then you need to read this section! That used to happen to me all the time until I finally figured out the key. Follow these steps and your pie will blind bake perfectly!
- once you have the pie crust rolled and in the pie plate, chill the pie crust for at least 30 mins before baking.
- cover the pie crust in parchment paper and fill the pie crust with pie weights when your blind baking for the first 15 mins.
- when you line the pie crust with the parchment paper, scrunch the paper up into a ball first. It will make it easier to mold to the pie.
- add some weight to the edges of the pie crust. Make a braid around the edge like we did, or just add extra crust to the top so that there’s less chance of it falling down the sides.
- after 15 mins, remove the pie weights from the pie and continue to cook for another 7 – 9 mins. This will let the bottom of the pie get nice and flaky crispy too.
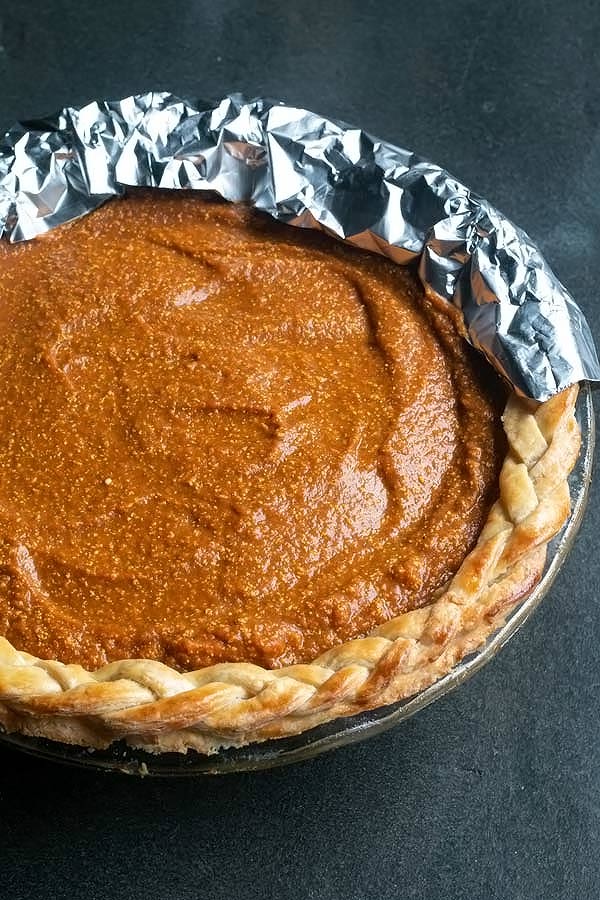
- cover the edges of your crust. You can use tin foil or you can get these cool covers that fit around the edges. Covering the edges will prevent them from burning or getting too crispy. (See the picture below)
You can see below how we used dried beans as pie weights. They work great and after we use them, we just keep them in a bag and reuse them each time we make a pie.
Some Ideas for Making your Pies Beautiful
Check out these quick videos that show you how to decorate your pie crust.
Making the Filling
Making the filling for pumpkin pie is super easy. Especially if you use canned pumpkin. You can go all out and roast a pumpkin, puree and use it for your pie, but its quite a bit more convenient to used canned.
We like a lot of spices in our pumpkin pie! It gives the pie a ton of flavor. We like cinnamon, ginger, cloves, nutmeg and vanilla!
If you can, use fresh nutmeg and grate it in yourself. If you have always used the ground nutmeg and you find the whole nutmeg and grate it yourself, you will see right away why we recommend this! It smells AMAZING and you can taste the difference. You will never go back!
Making Dairy Free Filling
We use coconut cream to make this pumpkin pie dairy free. Its so smooth and creamy and doesn’t taste like coconut at all. All the spices and the pumpkin take care of any coconut flavor it might have.
You can buy coconut cream by itself sometimes, but if you cant buy it, you can leave a can of full fat coconut milk in the fridge overnight and then open it without shaking. The cream will all be at the top and you can scoop it out easily.
Tips for Perfect Filling
- make sure all your ingredients are at room temperature before starting. This will make them mix together easier.
- if you don’t care about your pie being dairy free, use half and half cream or heavy whipping cream in place of the coconut cream. You definitely want it to be very creamy.
- if you do use coconut cream, don’t be alarmed if it looks kind of curdled before you bake it. See the picture above with the foil around the edge of the crust. You can see how it looks a little curdled. While the pie bakes, the coconut cream will melt and become all creamy.
Look how creamy that filling looks! And while your at it, check out how the bottom of the pie crust still looks nice and flaky. Not soggy at all!
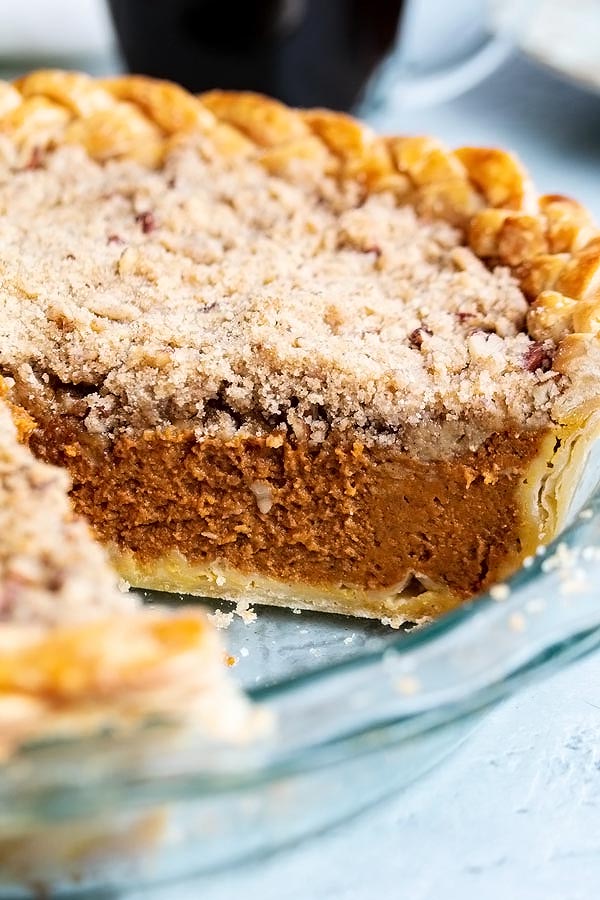
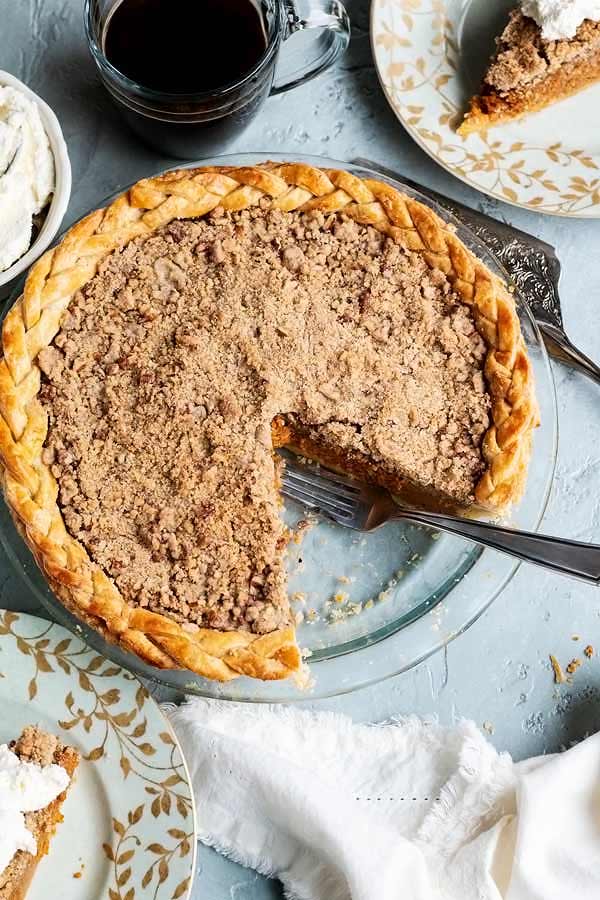
Making the Streusel Topping
This part is very easy! You just chop your pecans, mix all the ingredients and your done.
If you have not had a pumpkin pie with streusel topping then you HAVE to try it! Everyone says its the best part.
If you want to make your streusel topping dairy free as well, then use lard or vegetable shortening when you make it, instead of the butter.
Frequently Asked Questions
How do you keep a pumpkin pie from getting soggy?
This is exactly why you blind bake a pumpkin pie. I have tried both and I never get a soggy crust when I blind bake the pie crust before baking the filling.
How do you keep the edges of the pie crust from burning?
Cover the edges of the pie crust with tin foil or reusable pie crust covers. This works really well. There’s nothing worse than having a beautiful pie and all the edges are burnt to a crisp!
How do you thicken a pumpkin pie?
The pumpkin pie is thickened by the eggs. If you are worried about your pumpkin pie not setting, you can add a tablespoon of cornstartch to your filling mixture and that will give you some extra security 🙂 Ive never added cornstarch, but you can!
Can you over cook a pumpkin pie?
Yes! If you cook it at too high of a temperature or too long, the filling will crack or separate. You want your pumpkin pie to be just slightly jiggly in the center when your done baking.
When you have a streusel topping on the pie, its hard to tell, but if you follow our cooking times and oven temperature guidelines, you should be just fine.
How do you keep a pumpkin pie from cracking?
Don’t overcook it or cook it at too high a temperature. Bake the pie at 375 and for as long as your recipe says. It will crack if it gets over cooked.
Should I refrigerate pumpkin pie?
If you are not going to eat your pumpkin pie the same day you bake it, you need to refrigerate it until you are ready to eat it. Up to 3 days, but 3 days is pushing it.
Let it cool completely before putting it in the fridge. If it will be in the fridge for a while, its best to cover it with tin foil or something.
When you are ready to eat it, take it out of the fridge and let it come to room temperature before digging in!
Can I freeze pumpkin pie?
Yup, you sure can. You can freeze it for up to 3 months or so. You will want to wrap it in plastic wrap and maybe even a layer of foil to protect it from freezer smells and freezer burn.
Let it cool completely before freezing the pie. When you are ready to eat it, thaw it completely in the fridge, not on the counter. This will take at least 12 hours, but it will give you a better result.
Other Thanksgiving and Christmas Dinner Recipes
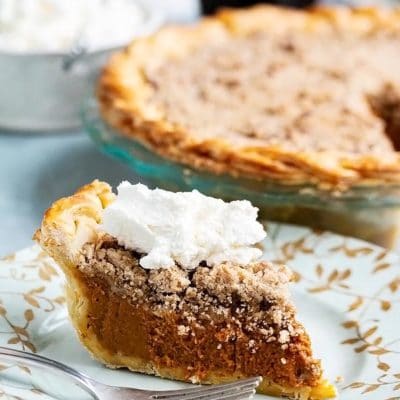
Other than serving your pumpkin pie with a generous dollop of whipped cream, here are some other thanksgiving favorites of ours:
- how to brine a turkey- step by step instructions for a turkey dinner
- homemade cranberry sauce recipe with bourbon
- amazing turkey stuffing with sausage
- fall apart boiled ham
- garlic potatoes with dill
- our favorite layered salad
These recipes are all staples of our Thanksgiving and/or Christmas dinner table. They are our favorites for a reason!! 😉
Other Pumpkin Recipes you Might Like
- spiked pumpkin spiced latte
- spiced pumpkin & bourbon crème brûlée
- spiced pumpkin napoleon & salted caramel with rum
If you’ve tried this streusel pumpkin pie recipe then don’t forget to rate the recipe and let us know how it turned out in the comments below. We love hearing from you!
We love to see your creations! Tag @Cookswithcocktails if you post a picture of this recipe on INSTAGRAM
The BEST Streusel Pumpkin Pie {Dairy Free Filling}
Ingredients
FOR THE PASTRY
- 2 1/2 cups flour
- 1 tsp salt
- 1 tbsp sugar
- 3/4 cup butter , cold and diced (or vegetable shortening)
- 1 egg yolk , beaten
- 2 tsp white wine vinegar
- 6-8 tbsp cold water plus a tablespoon or two more if needed
- 1 egg for an egg wash
FOR THE PIE FILLING
- 1 cup brown sugar
- 1 tsp salt
- 2 tsp cinnamon
- 1/2 tsp ginger
- 1/4 tsp cloves
- 1/2 tsp nutmeg use fresh if you can find it
- 1/4 tsp cardamom
- 2 tsp vanilla
- 4 eggs
- 796 ml pumpkin
- 1 cup coconut cream (dont shake the can and just use the cream at the top of the can. Not the water)
FOR THE STEUSEL TOPPING
- 1 cup flour
- 1/2 cup brown sugar
- 1/2 cup cold butter
- 1/2 cup chopped pecans
- 1 tsp cinnamon
- 1/2 tsp nutmeg use fresh if you can find it
Instructions
MAKE THE PASTRY
- In a small bowl, add the egg and break it up with a fork. Add the vinegar and the cold water. Set it in the fridge till you are ready for it to keep it cold. You can add an ice cube to keep it extra cold too.
- In a bowl or your mixer, add the dry ingredients. Then add the cold butter. Pulse in your mixer till it resembles small peas, or break up with a pastry cutter by hand.
- Add the liquid slowly and mix till just combined. Pour out on to a surface and mold into a ball. Wrap it in plastic wrap and place in the fridge for at least 1/2 an hour. 1 hour is better.
- After an hour, cut 1/3 of the pastry from the pasty ball. Put the 1/3 back in the fridge. Roll out the pie crust so that it fits a 9 inch pie plate. Leave a little hanging over the edges for now.
- Get the rest of the pie crust and use it to make the pie crust look pretty. See the notes below for some ideas. Put the pie crust in the fridge for at least 30 mins before blind baking.
BLIND BAKE THE PIE CRUST
- Preheat your oven to 400 degrees. Take the pie crust out of the fridge. Prick the bottom of your pie crust with a fork. Just a couple times. Crumple up a piece of parchment paper and fit it inside your crust. Add your pie weights (or use dried beans like me) to the inside of your pie crust.
- Bake the pie crust for 15 mins, the remove from the oven and remove the pie weights from the pie, cover the edges of your pie with foil or a pie crust cover and add it back to the oven. Continue to cook for another 7 – 9 mins. This will let the bottom of the pie get nice and flaky crispy too. Remove from the oven and set it aside till your ready for the filling.
MAKE THE FILLING
- While your pie crust is baking, make the filling. When the pie crust comes out, reduce the oven temperature to 375.
- Mix together the dry ingredients (sugar and spices) in a bowl. Add the eggs, pumpkin, and coconut cream to a stand mixer bowl or any bowl if your using a hand mixer or elbow grease. Mix well then add the sugar and spices. Pour into the pie crust. Bake pie for 15 mins to start, then cover with tinfoil to stop the edges from turning too brown. Bake for another 25 mins.
- Pour the filling into the pie crust. Cover the edges of the pie crust again. Bake the pie for 30 mins to start, Your going to add the streusel after 30 mins and bake for another 20 mins.
MAKE THE TOPPING
- While the pie is doing the first 30 min bake, make the streusel.
- Chop the pecans. You want them to be small, but not fine. Mix all the ingredients in a bowl and cut the butter in with a pastry cutter till it resembles coarse peas. After 30 mins, take the pie out of the oven, add the streusel all over the top of the pie. It might look thick, but thats ok. Bake for another 20 mins, but make sure to keep the tin foil on to protect the edges.
- Remove from the oven and allow it to cool completely before serving. (at least 3 or 4 hours) Serve with whipped cream or whipped coconut cream. Or ice cream even!
Notes
- always use very cold ingredients
- you can use vodka instead of vinegar if you like, it works the same. I just like the flavor of vinegar 🙂
- when you are mixing the wet ingredients in, its ok if the dough is quite floury. It doesn’t have to be completely mixed in. The moisture in the dough will absorb all the flour as the dough chills. The more you work the dough, the less flaky it will be and you want flaky!
- Using the 1/3 extra crust dough, roll it out into long strips. Cut three small strips out of it and make a braid with them to go around the edge of the pie. Add new strips to your original strips if your first ones didn’t make a braid long enough to go around the pie. Brush the edges of your pie with an egg wash (just an egg that has been beaten) and add the braid all the way around the edge. Cut off any crust hanging over the edge and brush the braid with the egg wash too.
- Using the 1/3 extra crust dough, roll it out into long strips. Cut a wide strip (the width of the top of you pie plate) and put it around the edges of the pie plate on top of your original crust. Cut the excess off that is hanging off the edges of the pie plate and work the new pastry into the original. This will make the top edges of the pie crust much more heavy. Then using your fingers, crimp the edges so they look pretty.